Part 2: Configuring external DNS for a custom domain
In this guide, you will learn how to configure external domains for your FastStore and VTEX website. The process involves the following steps:
- Setting up your external DNS provider to point your custom domain to your VTEX website. Custom domains can be purchased from any domain registration platform.
- Configuring your custom domains in VTEX Account Settings.
- Associating your custom domains with your FastStore project.
Besides making your FastStore website accessible via a custom domain, VTEX Checkout will also be operational as soon as you complete this guide. You'll then be ready to continue configuring other VTEX solutions, such as Order Placed, Login, and My Account.
Before you start
- Set up your VTEX account.
- Develop your FastStore project with Next.js by following the Getting Started track.
- Deploy your FastStore project.
- Buy the desired domain.
- Redirect the root domain to the
wwwsubdomain. (opens in a new tab)
Step by step
If you still need to configure other VTEX solutions, please use a fictitious domain name while taking the following steps. Once you have set up all the desired integrations, repeat this guide using your final domain to make your website publicly available to end-users.
Step 1 - Creating DNS records
- Access your domain provider's website.
- Create a CNAME DNS record for your
wwwdomain (e.g.,www.mystore.com) that points towww.{rootDomain}.com.cdn.vtex.com(e.g.,www.mystore.com.cdn.vtex.com). Check the documentation of your domain provider for more information. - Now, create a CNAME record for the
securesubdomain (e.g.,secure.mystore.com) that points tosecure.{rootDomain}.cdn.vtex.com(e.g.,secure.mystore.com.cdn.vtex.com). This subdomain will be used by the Checkout, Order Placed, Login, and My Account pages.
Please note that the configured addresses may not be immediately available to everyone due to DNS propagation, which can take 24-48 hours to complete.
Step 2 - Putting your account into production
To proceed, make sure your store is active and in production, to do this, follow the steps in the article Putting your account into production (opens in a new tab).
Step 3 - Configuring domains in VTEX Account Settings
Now, you must set up your VTEX account to use the DNS records created in the previous step.
- On VTEX Admin, click your profile avatar, which can be identified by the first letter of your email address.
- Access Account Settings > Account.
- Go to the Stores tab and in the Hosts table, click the menu (⋮) and choose Edit.
- In the Hosts field, enter your main domain (e.g.,
mystore.com) to the list. - Click
Add. - Add the
securesubdomain (e.g.,secure.mystore.com) to the list.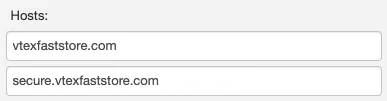
- Click the Save button.
Step 3 - Associating your custom domain with your FastStore project
Back to your FastStore project, you must also configure your project to point to the right addresses and domains.
-
Open your FastStore project in any code editor of your preference.
-
Open the
faststore.config.jsfile. -
Update the
storeUrl,secureSubdomain,checkoutUrl,loginUrl, andaccountUrlproperties as in the following:storeUrl:https://{rootDomain}secureSubdomain:https://{subdomain}.{rootDomain}checkoutUrl:https://{subdomain}.{rootDomain}/checkoutloginUrl:https://{subdomain}.{rootDomain}/api/io/loginaccountUrl:https://{subdomain}.{rootDomain}/api/io/account
Take the following example of how this code block would look after configuring a store with the www.mystore.com domain and secure subdomain:
4. In the Hosts field, enter your main domain (e.g., mystore.com) in the list.
- Click
Add. - Add the
securesubdomain (e.g.,secure.mystore.com) to the list. - Click the
Savebutton.
Step 4 - Associating your custom domain with your FastStore project
Back to your FastStore project, you must also configure your project to point to the right addresses and domains.
-
Open your FastStore project in any code editor of your preference.
-
Open the
faststore.config.jsfile. -
Update the
storeUrl,secureSubdomain,checkoutUrl,loginUrl, andaccountUrlproperties as in the following:storeUrl:https://{rootDomain}secureSubdomain:https://{subdomain}.{rootDomain}checkoutUrl:https://{subdomain}.{rootDomain}/checkoutloginUrl:https://{subdomain}.{rootDomain}/api/io/loginaccountUrl:https://{subdomain}.{rootDomain}/api/io/account
Take the following example of how this code block would look after configuring a store with the www.mystore.com domain and secure subdomain:
...

// Default channel
channel: '1',

+  // Production URLs
+  storeUrl: 'https://www.mystore.com',
+  secureSubdomain: 'https://secure.mystore.com',
+  checkoutUrl: 'https://secure.mystore.com/checkout',
+  loginUrl: 'https://secure.mystore.com/api/io/login',
+  accountUrl: 'https://secure.mystore.com/api/io/account',

// Lighthouse CI
lighthouse: {
...- Save your changes.
- Open the
vtex.envfile. - Add the
SITE_HOSTkey with the main domain specified in Configuring domains in VTEX Account Settings as the value.
+ SITE_HOST=www.mystore.com- Save your changes.
- Open a Pull Request, commit your changes, and deploy them to
main/master.
Step 5 - Configuring the CDN workflow (Only for new go-lives)
If your FastStore website is going live for the first time, open a ticket with VTEX Support (opens in a new tab) and specify that you need to configure the CDN workflow for the secure and main domains of your store.
Remember to include the following information in your ticket:
- Your VTEX account name.
- The secure and main domains of your store.
The VTEX team will evaluate your request and take the necessary actions to configure the CDN workflow for your account.